Icons can be resized to the precise size that you want so that you can estimate the space that you can use for objects. There are two ways to change the size of an icon.
Changing Size using the Resizing Tool
When the appearance of the icon based on its size is more important to you than precise dimensions for the icon, you can use the resizing tool to resize the icon. To do this:
| 1. | Select the icon, this opens the bounding box with tools in each of the corners. |
| 2. | Click on the resizing tool  . . |
| 3. | Without removing your finger from the mouse button, drag the resizing tool towards or away from the icon to change the size of the icon. The icon will expand or shrink with the center of the icon as an anchor point. |
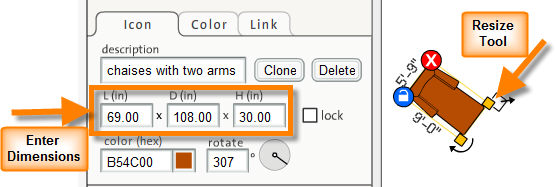
Changing Size using the Dimension Fields
When you need precise dimensions for the icon, use the dimension fields in the icon properties panel on the left.
| 1. | Select the Icon by clicking on it. |
| 2. | With the icon selected, enter number values in the Length, Depth or Height fields. The icons are two dimensional, so the height is not applied graphically. However, when an icon summary is included in the printout, the height is listed for icons. |


