|
<< Click to Display Table of Contents >> Adding Floors |
  
|
|
<< Click to Display Table of Contents >> Adding Floors |
  
|
You can add floors to your floor plan in Icovia using the add flooring tool in the editor toolbar.
| 1. | Select the add flooring tool from the toolbar by clicking on it. |

| 2. | Click once in the work area to establish the location of the first point. |
| 3. | Then move your cursor to the next corner and click to set the next point. Continue until the entire floor is drawn. |

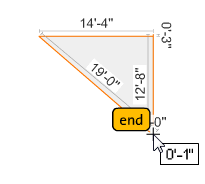
| 4. | Draw a floor to best approximate the desired shape, and edit floor corners after completing a floor. You can add a corner at any time. As each corner point is added to the floor, the shape of the floor changes to include all points. As you add points, the length of each segment is shown. |
| 5. | When all the points have been added to the floor, click on the End control that appears along the floor as you add points. |
| 6. | Click the “end” button when you’re finished. |
Floors always snap to 90 and 45 degree increments when first drawn. You can override this default setting by turning off the Snap Walls 90° command.
Note: If the End control gets in your way, click near it and simply edit the floor shape after drawing the entire floor.
Additional points can be added to the floor by clicking on an edge while pressing the [Ctrl] key on your keyboard.
Note: To annotate the plan with the length of each leg, you can use the Add Area Dimension Tool. However, area dimensions cannot be assigned colors or web pages as floor can.