|
<< Click to Display Table of Contents >> Icovia Tools and Interface |
  
|
|
<< Click to Display Table of Contents >> Icovia Tools and Interface |
|
The Icovia application is presented in an intuitive layout that provides easy access to the robust functionality. The Icovia screen is presented with the following areas.
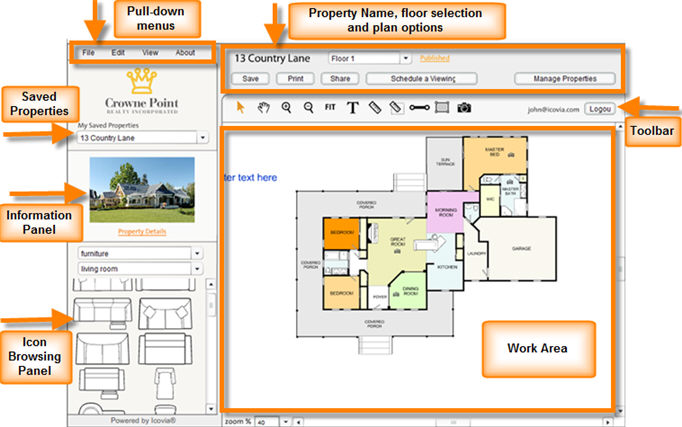
The largest area, on the right side of the screen is the work area. This is the area where your plan is developed. Scroll bars provide easy panning.
Immediately above the work area is the editor toolbar area. This area gives you quick access to the most commonly used commands.
Immediately above the editor toolbar, to the right of the pull down menus is the property name and the floor selection section. This name of the property you are currently viewing and navigation to the different floors is displayed in this section. This section also has the buttons to the main plan options like Save plan, Print plan, share plan, Schedule a Viewing and Manage Properties.
To the upper left side of the screen is the pull-down menu area. Most of the commands in Icovia can be found here.
My Saved Properties
Immediately below the menus is the My Saved Properties area. This area lists the name of the current plan and when expanded shows a list of all your saved properties. Any plan that you save will be displayed in this list and can be opened from this area.
Info Panel
In the middle of the sidebar area Information panel. This area is used to provide contextual details and controls. When a floor plan is selected, the property photo and a link to the property details are displayed here, when an icon is selected, the icon properties panel is displayed here. When a floor is selected, the floor info panel is displayed. When text is selected, the text info panel appears. There are other similar contextual applications for this part of the sidebar area.
Icon Browsing Panel
At the bottom of the sidebar area is the icon browsing panel. Icons are presented in sets according to categories and subcategories. Once the desired icon set is selected, use the slide bar to view all icons. Drag the desired icon onto the work area to add it to your plan.